Table of Contents
TraffiCalm Speed Connect (Web) Scheduling
Configure sign schedules with daily, weekly, dated rules to activate traffic configurations automatically


There is a -M at the end of the model number for MUTCD compliant rings
1. Scheduling
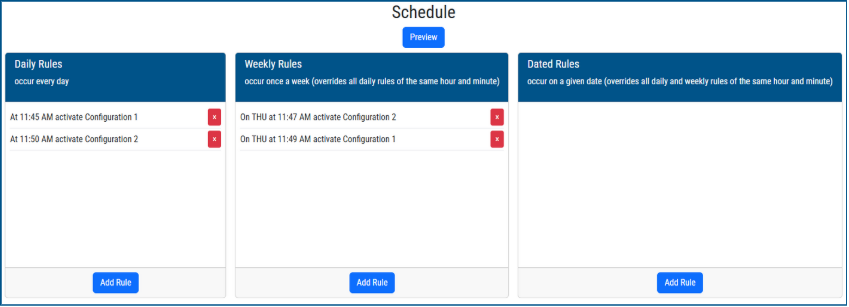
There are three different scheduling rules:
- Daily Rules: Will activate daily at the selected time
- Weekly Rules: Will activate on a select day of the week at time selected.
- Dated Rules: Will activate on a specific day at time selected
Dated rules will supersede weekly & daily rules at the same hour and minute weekly rules will supersede daily rules at the same hour and minute
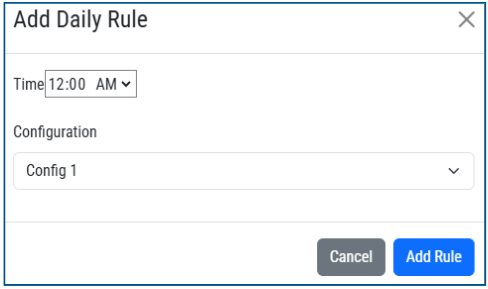
Add Daily Rule
- Click “Add Rule” in Daily rules
- Select the time for the rule to activate
- Select the configuration you would like to run at the selected time
- Click “Add Rule” to save
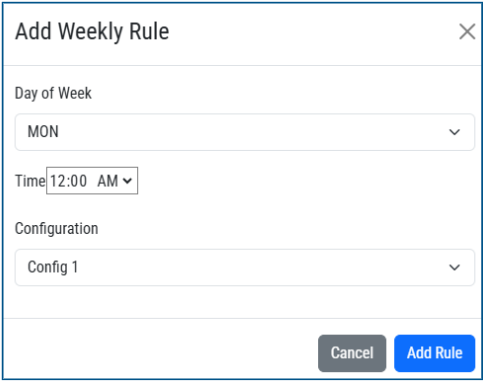
Add Weekly Rule
- Click “Add Rule” in Weekly rules
- Select the day of the week
- Select the time for the rule to activate
- Select the configuration you would like to run at the selected time
- Click “Add Rule” to save
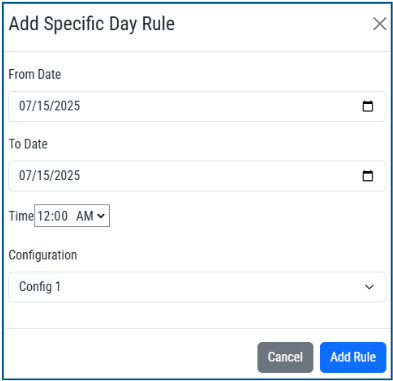
Add Specific Day Rule
- Click “Add Rule” in Dated rules
- Select the “From Date”
- Select the “To Date”
- Select the time for the rule to activate
- Select the configuration you would like to run at the selected time
- Click “Add Rule” to save
2. Scheduling Example (Standard)
Basic Scheduling (24/7 Speed compliance)
This example will show you how to set up a configuration showing the speed of drivers with flashing beacons.
Configuration:
- Click “Configurations” from the top bar
- Select “Configuration 1 & click “Edit”
Step 1:
- Sign Hardware: Full Matrix
- Operation Mode: Driver Feedback
- External beacon Mode: Flash Alternately when triggered
- MUTCD Compliance: Leave checked
- Click “Next”
Step 2 :
- Minimum Feedback Speed: 5 MPH
- Speed limit: 25 MPH (This will be your posted speed limit)
- Show driver speed: Leave checked
- Trigger External Beacons: Leave Unchecked
- Click “Next”
Step 3:
- Maximum Warning Speed: 50 MPH (This is the max you want drivers to see their speed)
- Show driver speed: Leave checked
- Trigger External Beacons: Check box
- Click “Next”
Step 4:
- Maximum Feedback Speed: Set to 99 (This will enable the beacons to stay flashing)
- Show driver Speed: Leave Unchecked
- Trigger External Beacons: Check box
- Click “Save Configuration”
Step 5:
- Click “Schedule” from the top bar
- If any rules are listed, click the red X and delete them out of the schedule
- Under “Daily Rules” click “Add Rule”
- Set time to 12:00AM
- Configuration: Select Configuration 1
- Click “Add Rule”
- Click the green “Set Schedule”
Congratulations! your sign is now active and will display configuration 1 daily
3. Scheduling Example (School Zone)
School Zone Scheduling
This example will show you how to set up a configuration for a school zone
Configuration:
- Click “Configurations” from the top bar
- Select “Configuration 1 & click “Edit”
Step 1:
- Sign Hardware: Full Matrix
- Operation Mode: Driver Feedback
- External beacon Mode: Flash Alternately when triggered
- MUTCD Compliance: Leave checked
- Click “Next”
Step 2 :
- Minimum Feedback Speed: 5 MPH
- Speed limit: 25 MPH (This will be your posted speed limit)
- Show driver speed: Leave checked
- Trigger External Beacons: Leave Unchecked
- Click “Next”
Step 3:
- Maximum Warning Speed: 50 MPH (This is the max you want drivers to see their speed)
- Show driver speed: Leave checked
- Trigger External Beacons: Leave Unchecked
- Click “Next”
Step 4:
- Maximum Feedback Speed: Set to 99 (This will enable the beacons to stay flashing)
- Show driver Speed: Leave Unchecked
- Trigger External Beacons: Leave Unchecked
- Click “Save Configuration”
- Click “Configurations” from the top bar
- Select “Configuration 2 & click “Edit”
Step 5:
- Sign Hardware: Full Matrix
- Operation Mode: Driver Feedback
- External beacon Mode: Flash Alternately Always
- MUTCD Compliance: Leave checked
- Click “Next”
Step 6 :
- Minimum Feedback Speed: 5 MPH
- Speed limit: 15 MPH (This will be your School zone speed limit)
- Show driver speed: Leave checked
- Click “Next”
Step 7:
- Maximum Warning Speed: 50 MPH (This is the max you want drivers to see their speed)
- Show driver speed: Leave checked
- Click “Next”
Step 8:
- Maximum Feedback Speed: Set to 99 (This will enable the beacons to stay flashing)
- Show driver Speed: Leave Unchecked
- Click “Save Configuration”
Step 9:
- Click “Schedule” from the top bar
- If any rules are listed, click the red X and delete them out of the schedule
- Daily rules:
- Under “Daily Rules” click “Add Rule”
- Set time to 12:00AM
- Configuration: Select Configuration 1
- Click “Add Rule”
- Weekly Rules
- Click “Add Rule”
- Select: Mon (Monday)
- Select Time: 7:00 AM (The time you want School zone speed limit to start)
- Select “Config 2”
- Click “Add Rule”
- Weekly Rules
- Click “Add Rule”
- Select: Mon (Monday)
- Select Time: 9:00 AM (The time you want School zone speed limit to stop)
- Select “Config 1”
- Click “Add Rule”
- Repeat Weekly Rules for afternoon times
- Repeat Weekly rules for the remainder of the week (Tue, Wed, Thur, Fri)
Step 10:
- Dated Rules
- Click “Add Rule”
- From Date: Select the start date
- To Date: Select the end date
- Time: 7:00AM ( Same time as your start time on weekly )
- Select “Config 1”
- Select “Add Rule” Repeat for each time that needs to be over written.
- Click the green “Set Schedule”
Congratulations! your sign is now active and will display configuration 1 daily
Was this helpful?
TraffiCalm Speed Connect (Web) Software Configuration for iQ series signs
TC Speed Connect User Guide (LEGACY)