Table of Contents
TraffiCalm Speed Connect (Web) Software Configuration for iQ series signs
Windows web app for configuring TraffiCalm radar signs via Bluetooth: step-by-step driver feedback setup


There is a -M at the end of the model number for MUTCD compliant rings
Opening the software
1. Loading the Program
1.1 Open the following link in a Chromium based browser (Chrome, Edge, Opera):
- https://trafficalm-systems.github.io/speed_connect_web/
- or go to https://trafficalm.com/resources/radar-speed-signs
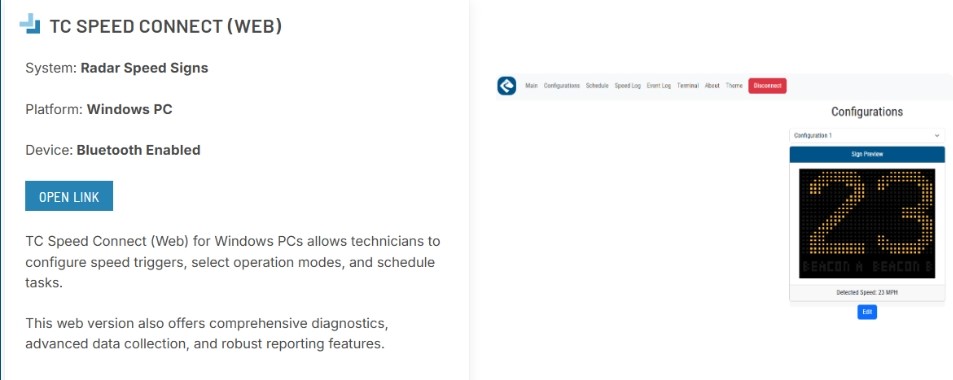
1.2 Scroll down to “TC Speed Connect (Web)”
1.3 Click "Open Link"
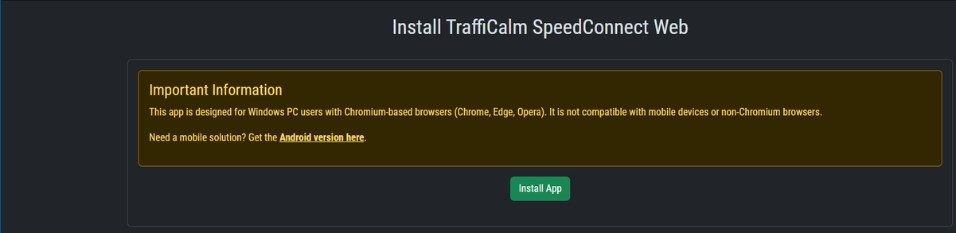
1.4 If this is your first time adding the app, the page below will appear. Click "Install App"
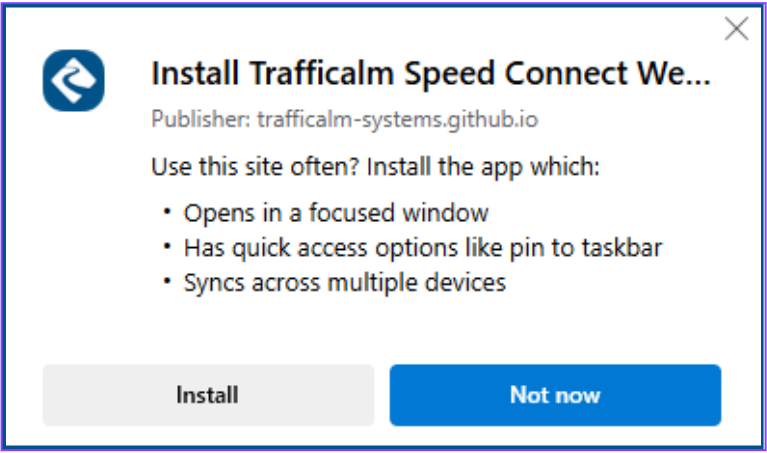
1.5 Click “Install”
1.6 After installing, a dialog page will appear asking if you would like to create a shortcut for the app
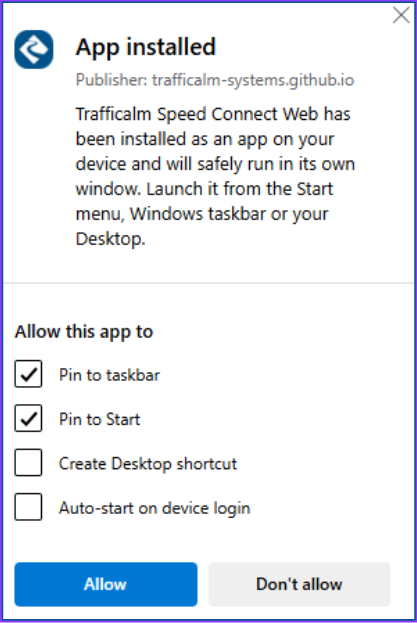
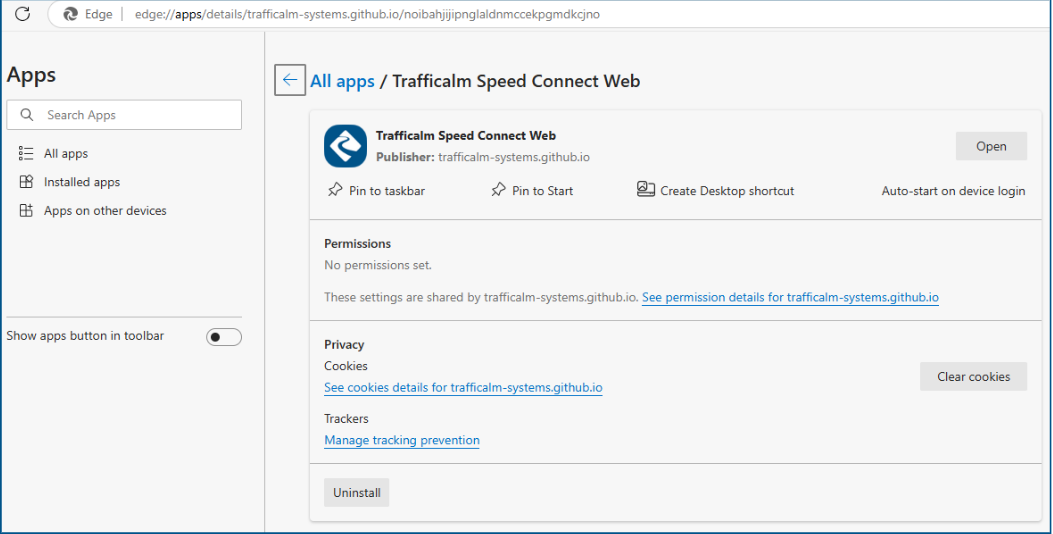
If you selected a desktop shortcut, it will be added to your desktop

2. Pairing the Sign
After installing, a “Connect to your sign” page will appear
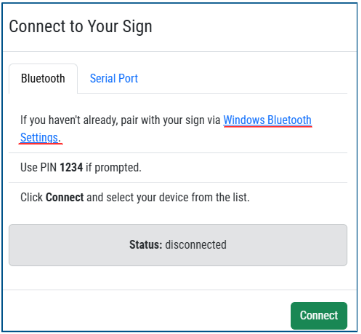
BLUETOOTH SETUP
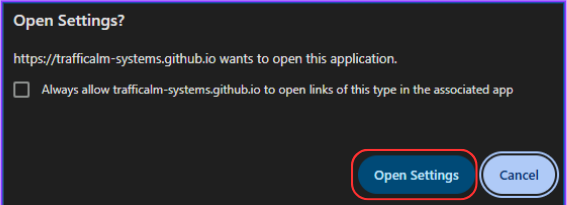
2.1 Open the Bluetooth settings by click the “Windows Bluetooth Settings”. A prompt box will open asking to open settings. Click “Open Settings”
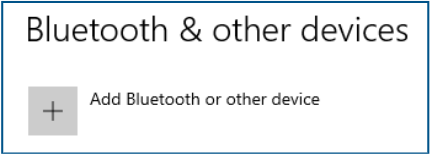
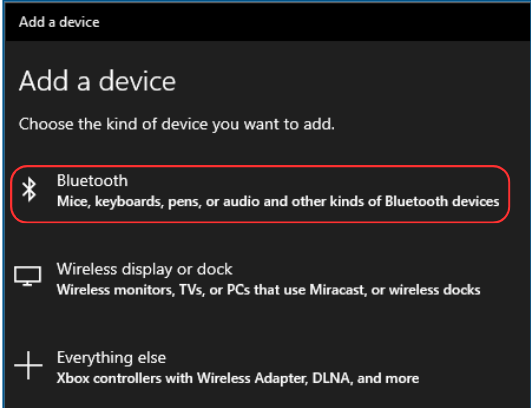
2.2 Click “Add Bluetooth or other device”
2.3 Click “Bluetooth
2.4 Find your Radar Speed sign, The device name will be the units serial number
- Connect with PIN: 1234

2.5 After successfully connecting, return back to the web browser
RS232 CONNECTION

2.6 Locate the RS232 port on the bottom of the sign module. Plug in a RS232 to USB adaptor into the sign module port.
- BEFORE PLUGGIN INTO THE PC, Check the existing COM ports by opening up Device Manager
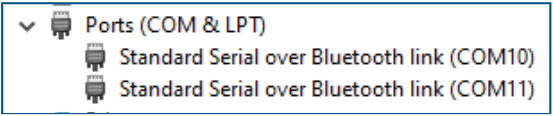
- Plug the USB end into the PC & note the new COM port
- Click Connect & select the new port

3. Login
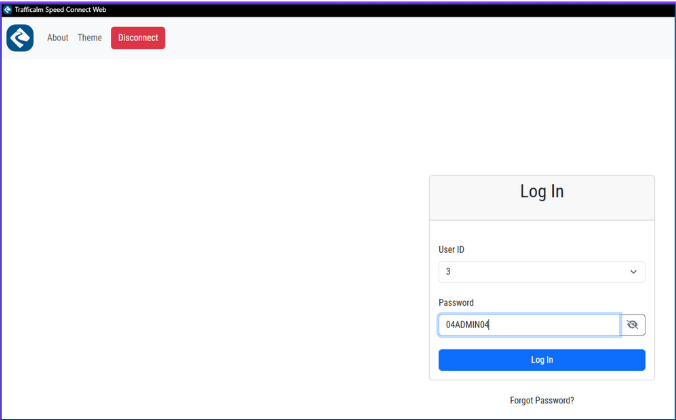
3.1 Once properly paired, the Log in screen will appear
- Default login is as follows:
- User ID: 3
- Password: 04ADMIN04 (Case sensitive)
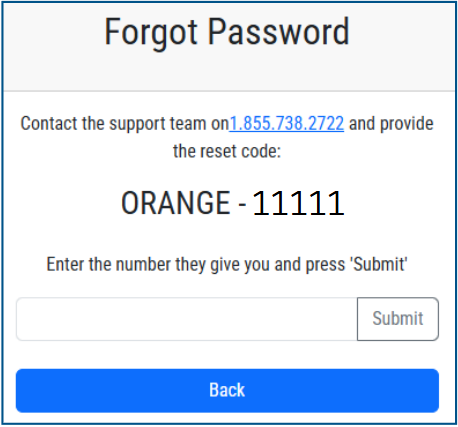
3.2 Forgot password?
- Click “Forgot password”
- Call TraffiCalm Support team at 1-855-738-2722
- Provide the “Reset code” to a support team member. This will reset user 9 to the factory default password (04ADMIN04)
4. Overview

After successfully login in, there will be several pages to choose from
- Main: Overview of the sign health and settings
- Configurations: set how the sign will function
- Schedule: set when the sign will function
- Speed Log: Download and view speed logs from a certain time period
- Event Log: Download and view system event longs from a certain time period
- Terminal: execute command prompt's to the sign
- About: Current version ID & Support information
- Theme: Change the color to light or dark mode
- Disconnect: unpair with the connected sign
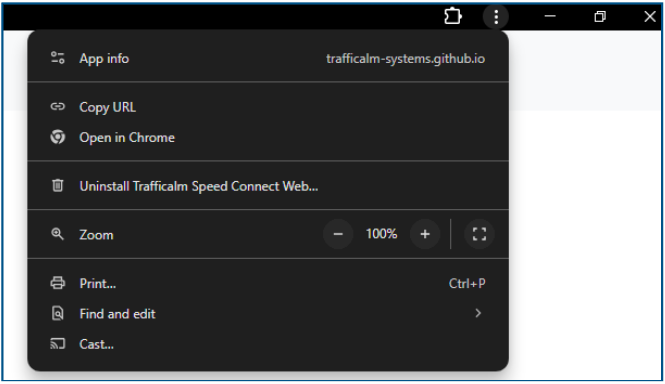
Additional options
- Click the three vertical dots in the top right corner of the app
- Get app info
- Uninstall
- open in a new window
- print screen
5. Main Page
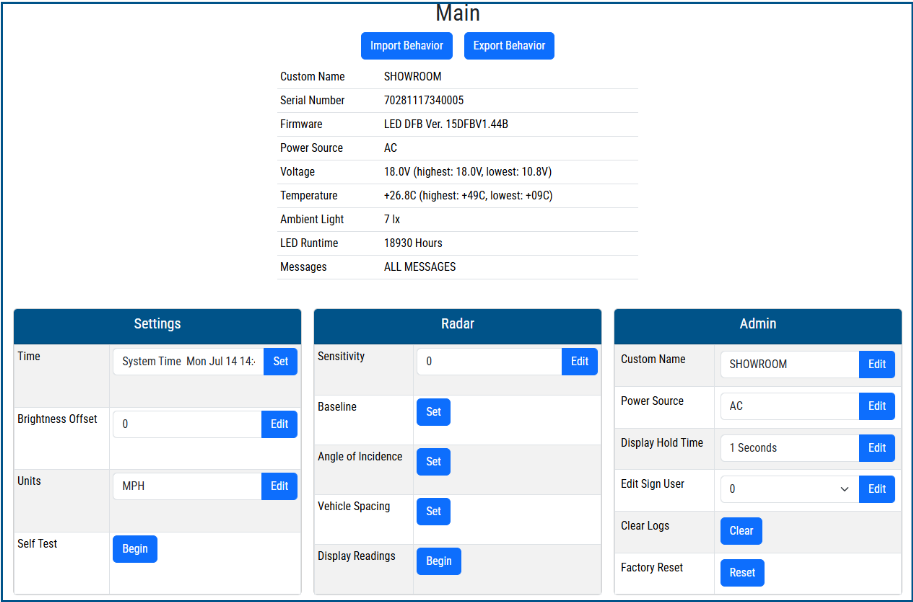
- Import Behavior: use a saved .TCB file to autoload preconfigured settings
- Export Behavior: Save the current configuration to a .TCB file
- Custom Name: If set
- Serial Number: Signs serial number
- Firmware: Current firmware running on sign
- Power Source: How the sign is powered
- Voltage: Current DC voltage reading
- Temperature: Current temp. reading from sign
- Ambient light: Current light reading from sign
- LED Runtime: Lifetime hours of LEDs on for the sign
- Messages: Indicated if there is a issue with the system
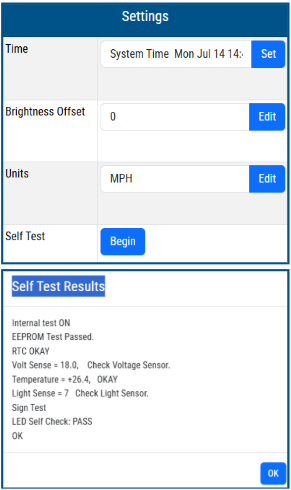
Settings
- Time: Set the correct time for the sign
- Brightness offset: O is default. -16 is the dimmest, +16 Brightest
- Units: Set to MPH or KPH
- Self Test: Runs a system test on the sign and indicated if any failures have occurred
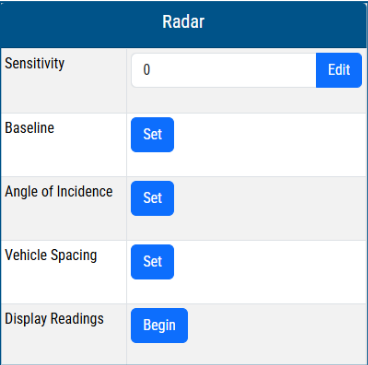
Radar
- Sensitivity: Makes radar readings more / less sensitive. Lower values detect less traffic, higher values detect more. Default is 0.
- Baseline: Setting the baseline will help filter out unwanted detections and minimize false detections. Wait for traffic to clear on the road and press Set
- Angle of Incidence: The angle in degrees of the sign to the oncoming traffic. Zero degrees describes a sign facing the traffic dead-on, 90 degrees is pointing across both lanes perpendicular to traffic. Default is 0
- Vehicle Spacing: The estimated distance from the front of one vehicle to the front of the next during typical traffic. Default is 50 feet.
- Display Reading: Give a preview of the Radar readings from the sign
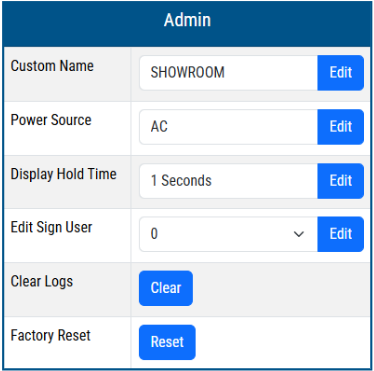
Admin
- Custom Name: Change the sign name
- Power Source: AC or Battery/Solar
- Display Hold Time: Changes the amount of time in seconds a speed is displayed for. Default is 1.
- Edit Sign user: Create up to 10 user logins. Can set as Admin or standard user.
- Clear Logs: Clears the speed & event logs from the sign
- Factory Reset: Restores the soft factory defaults
6. Configuration
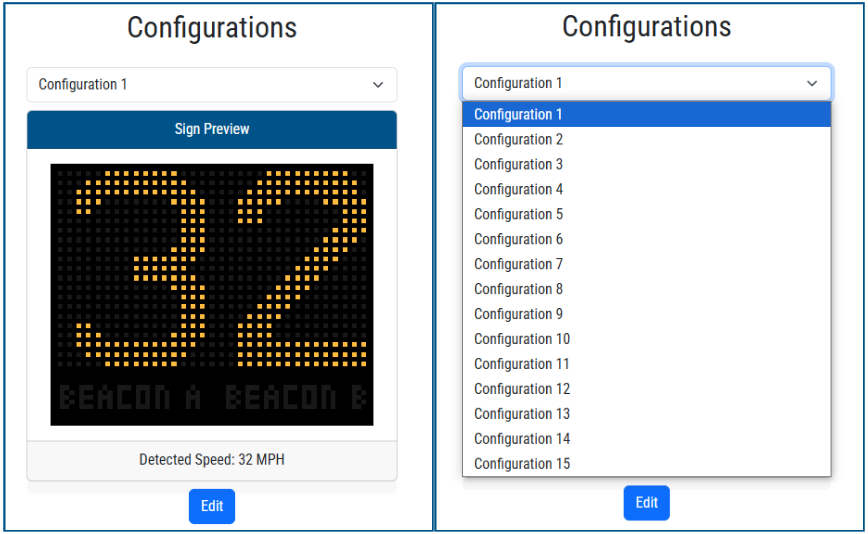
There is 15 configurations that can be programmed. Simply select one from the drop down menu and the click edit.
Configuration: Step 1 of 4
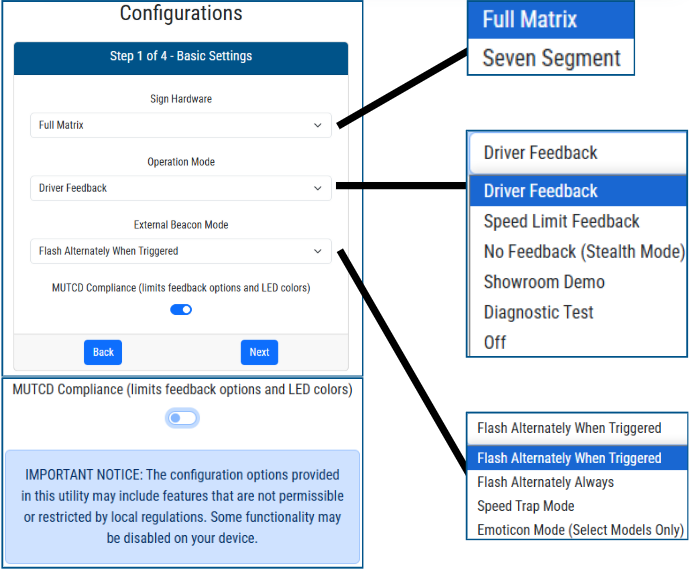
Sign Hardware:
- Full Matrix: Default. If unsure, Keep this selected
- Seven Segment: Only applies to certain 15" Driver feedback signs.
Operation Mode:
- Driver Feedback: Shows the drivers speed as they approach the sign
- Speed Limit Feedback: Shows the posted speed limit
- No Feedback (Stealth Mode): Sign remains blank but will still record speed data
- Showroom Demo: Demo mode showing different speeds Diagnostic
- Test: Used to visually inspect the LEDs on the sign
- Off: Sign is off, not collecting speed data
External Beacon Mode (Ignore if not used)
- Flash Alternately When Triggered: During steps 2 through 4, you can select when the beacons will flash under what circumstances
- Flash Alternately Always: Beacons will flash regardless of selection in steps 2 through 4
- Speed Trap Mode: Beacon A will be powered constant, Beacon B will be powered if driver is above speed limit
- Emoticon Mode (Select Models Only): Beacon B will be powered constant
MUTCD Compliance (Limits Feedback options & LED Colors)
- Enabled by default, Disabling will add additional options in steps 2 through 4
- None: Sign will display as normal
- Flashing: Sign will flash the speed
- Strobing Digits: Sign will strobe the speed
- Slow down: Sign will flash speed, followed by “slow down”
- Strobing Slow Down: Sign will strobe speed, followed by “slow down”
- Happy Face: Sign will flash speed, followed by “Happy Face emotion”
- Sad Face: Sign will flash speed, followed by “Sad Face emotion”
- Sad & Slow down: Sign will flash speed, followed by “Sad Face emotion & slow down”
Configuration: Step 2 of 4
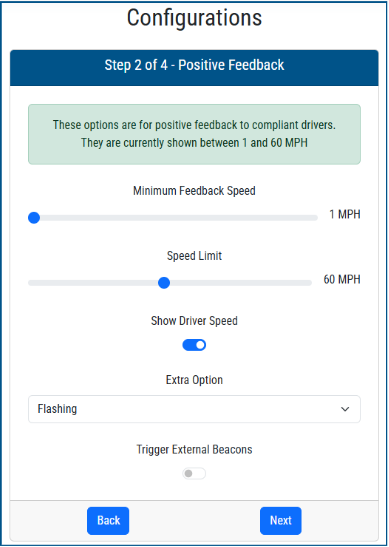
Positive Feedback (Drivers going at or below the speed limit)
- Minimum Feedback Speed: The minimum speed at which the sign will “turn on”
- Speed limit: The posted speed limit for the roadway. If used for school zone, this can also be the posted speed limit for a certain time of day (will be setup using the scheduling function)
- Show driver speed: Enabled by default. will display the drivers speed if selected
Extra options: (NON MUTCD COMPLIANT)
- None: Sign will display as normal
- Flashing: Sign will flash the speed
- Strobing Digits: Sign will strobe the speed
- Slow down: Sign will flash speed, followed by “slow down”
- Strobing Slow Down: Sign will strobe speed, followed by “slow down”
- Happy Face: Sign will flash speed, followed by “Happy Face emotion”
- Sad Face: Sign will flash speed, followed by “Sad Face emotion”
- Sad & Slow down: Sign will flash speed, followed by “Sad Face emotion & slow down”
Trigger External Beacons
- Enabling will flash beacons alternatively for drivers going at or below the speed limit selected on this page
Configuration: Step 3 of 4
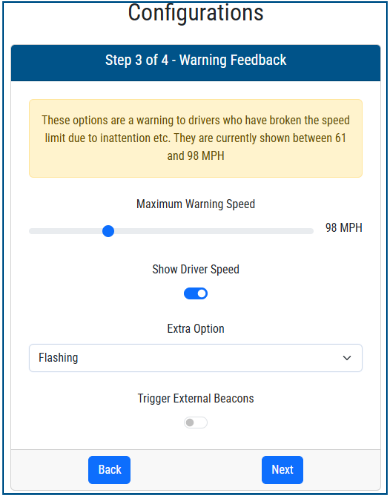
Warning Feedback (Drivers going above the speed limit)
- Maximum Warning Speed: The max speed at which the sign will display setting enabled on this page.
- Show driver speed: Enabled by default. will display the drivers speed if selected
Extra options: (NON MUTCD COMPLIANT)
- None: Sign will display as normal
- Flashing: Sign will flash the speed
- Strobing Digits: Sign will strobe the speed
- Slow down: Sign will flash speed, followed by “slow down”
- Strobing Slow Down: Sign will strobe speed, followed by “slow down”
- Happy Face: Sign will flash speed, followed by “Happy Face emotion”
- Sad Face: Sign will flash speed, followed by “Sad Face emotion”
- Sad & Slow down: Sign will flash speed, followed by “Sad Face emotion & slow down”
Trigger External Beacons
- Enabling will flash beacons alternatively for drivers going at or below the speed limit selected on this page
Configuration: Step 4 of 4
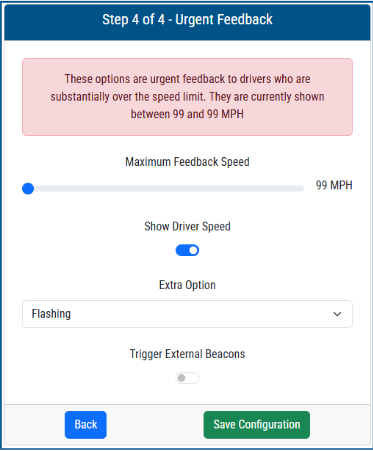
Urgent Feedback (Drivers going substantially above the speed limit)
- Maximum Feedback Speed: The max speed at which the sign will display (Used to prevent racing the sign)
- Show driver speed: Enabled by default. will display the drivers speed if selected
Extra options: (NON MUTCD COMPLIANT)
- None: Sign will display as normal
- Flashing: Sign will flash the speed
- Strobing Digits: Sign will strobe the speed
- Slow down: Sign will flash speed, followed by “slow down”
- Strobing Slow Down: Sign will strobe speed, followed by “slow down”
- Happy Face: Sign will flash speed, followed by “Happy Face emotion”
- Sad Face: Sign will flash speed, followed by “Sad Face emotion”
- Sad & Slow down: Sign will flash speed, followed by “Sad Face emotion & slow down”
Trigger External Beacons
- Enabling will flash beacons alternatively for drivers going at or below the speed limit selected on this page
7. Scheduling
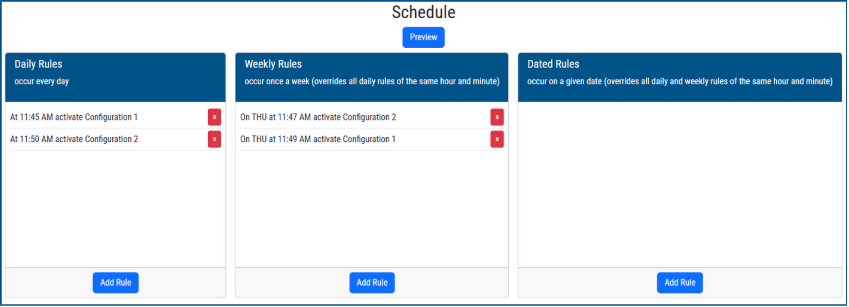
There are three different scheduling rules:
- Daily Rules: Will activate daily at the selected time
- Weekly Rules: Will activate on a select day of the week at time selected.
- Dated Rules: Will activate on a specific day at time selected
Dated rules will supersede weekly & daily rules at the same hour and minute weekly rules will supersede daily rules at the same hour and minute
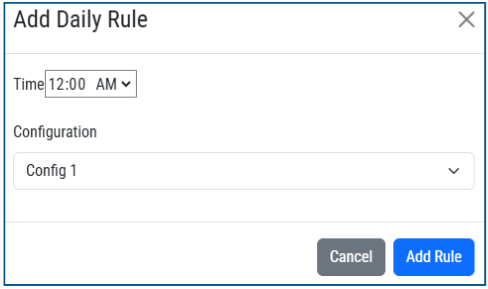
Add Daily Rule
- Click “Add Rule” in Daily rules
- Select the time for the rule to activate
- Select the configuration you would like to run at the selected time
- Click “Add Rule” to save
Add Weekly Rule
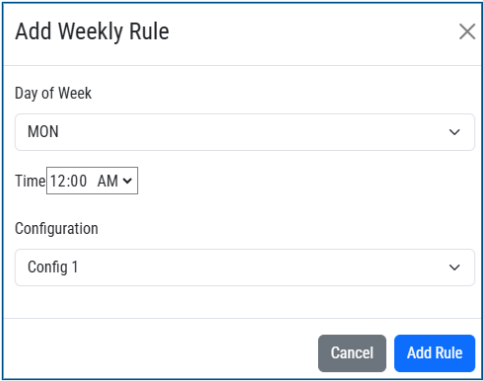
- Click “Add Rule” in Weekly rules
- Select the day of the week
- Select the time for the rule to activate
- Select the configuration you would like to run at the selected time
- Click “Add Rule” to save
Add Specific Day Rule
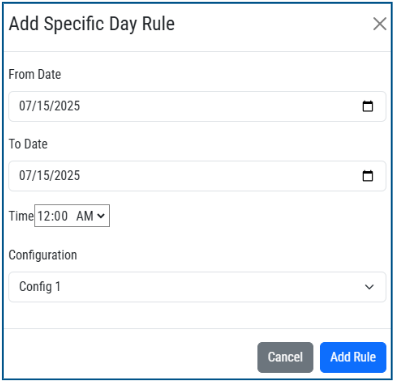
- Click “Add Rule” in Dated rules
- Select the “From Date”
- Select the “To Date”
- Select the time for the rule to activate
- Select the configuration you would like to run at the selected time
- Click “Add Rule” to save
8. Speed Log
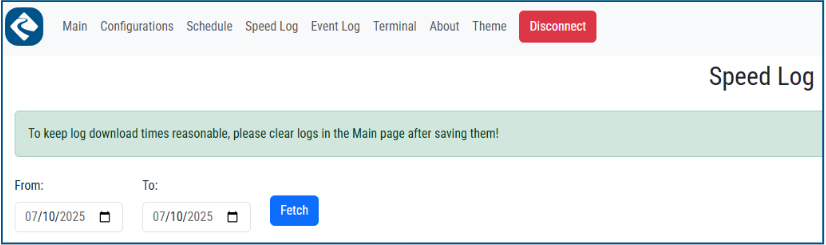
The Speed log will provide a breakdown of all the record speeds on a roadway for a given time frame.
- From: The start date you want speed data from
- To: The end date you want speed data from
- Fetch: Will pull the data from the selected time frame
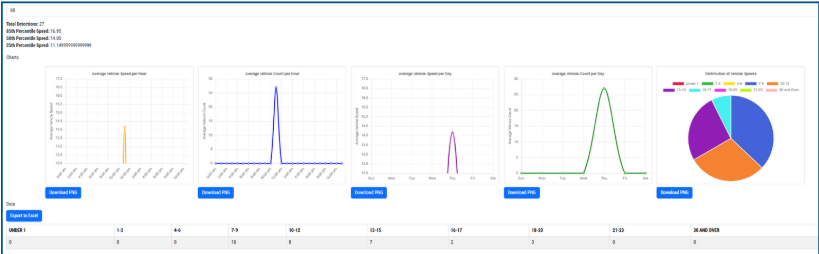
- Select Speed Limit: This will populate the data collected for that speed.
- Total Detections: total vehicles detected for that speed limit
- 85th Percentile Speed: the speed that 85% of traffic is traveling
- 50th Percentile Speed: the speed that 50% of traffic is traveling
- 25th Percentile Speed: the speed that 25% of traffic is traveling
Charts: Visual breakdown of the speed data
Data: [Export to Excel]
- Data points are populated every 15 minutes. It is viewable within the app or can be downloaded as an excel file for further manipulation.
9. Event Log
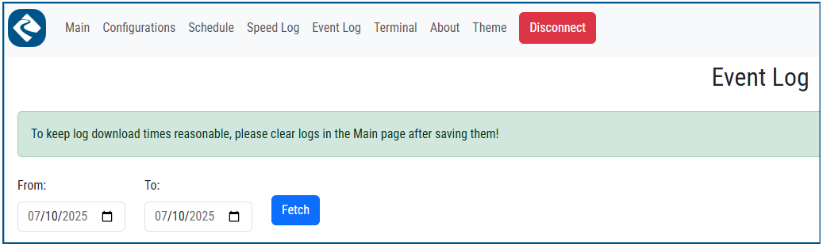
The Event log will provide a breakdown of the system health & status for a given time frame.
- From: The start date you want event data from
- To: The end date you want event data from
- Fetch: Will pull the data from the selected time frame
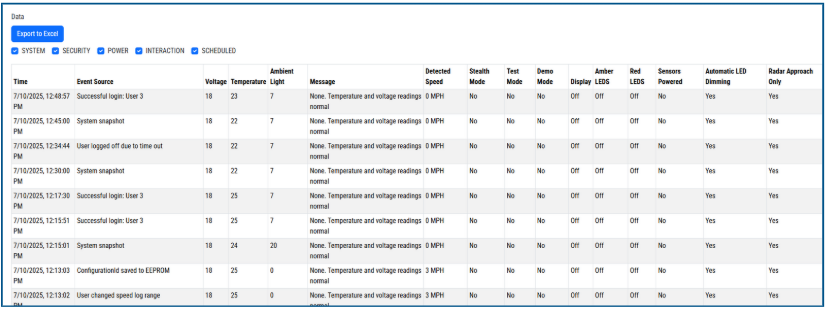
Data: [Export to Excel]
- Data points are populated every 15 minutes unless a user change is logged. It is viewable within the app or can be downloaded as an excel file for further manipulation.
The check box’s (System, Security, Power, Interaction, Scheduled) will show or hide those event types
- Time: Time stamp
- Event Source: Type of event
- Voltage: DCV
- Temp: Temperature recorded
- Ambient Light: LUX recorded
- Message: Additional information
- Detected Speed: Speed recorded
- Stealth mode: Yes or No
- Test Mode: Yes or No
- Demo Mode: Yes or No
- Display: On or Off
- Amber LEDS: On or Off
- Red LEDS: On or Off
- Sensors Powered: Yes or No
- Auto LED Dimming: Yes or No
- Radar Approach only: Yes or No
10. Terminal
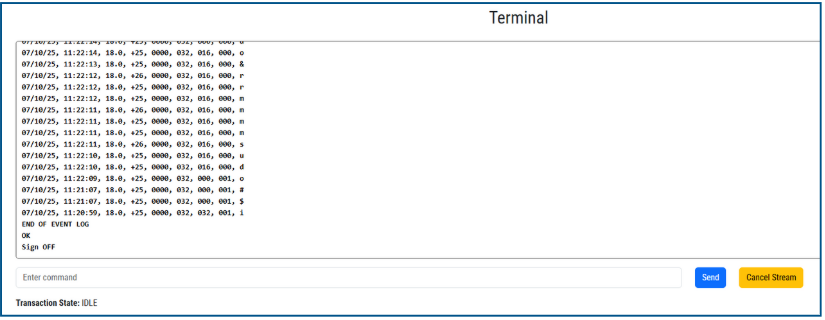
- Terminal Changes are only executable on a Admin account.
- Typically this will NOT be used unless advised so by a TraffiCalm Technician.
Was this helpful?
TraffiCalm Speed Connect (Web) Scheduling